

A History Woven Into Every Loaf, Twist, and Sweet Bite
There is something almost magical about braided bread.
Long before the first bite, a beautifully braided loaf tells a story. Its strands twist and cross, creating patterns that are both decorative and meaningful. Some braids are simple and rustic, while others are intricate works of edible art. Whether filled with cinnamon and sugar, enriched with butter and eggs, or made from a simple yeasted dough, braided breads have appeared in kitchens and bakeries around the world for centuries.
Today, braided breads and desserts are enjoying a renewed popularity. Social media has transformed them into stunning centerpieces, while artisan bakers continue to reinvent traditional recipes. But beneath the beautiful appearance lies something much deeper: history, tradition, celebration, and craftsmanship.
Where Did Braided Bread Begin?
There isn’t a single person, country, or moment that can be credited with inventing braided bread. Braiding dough developed independently in different cultures, and the technique evolved over hundreds—and in some cases thousands—of years.
The basic concept is remarkably simple: take strands of dough and intertwine them before baking. Yet that simple process creates a loaf with a distinctive appearance and texture.
Braiding may also have had practical advantages. Dividing dough into several strands could help create a loaf that baked evenly, while enriched doughs could be shaped into attractive forms for holidays and special occasions.
Over time, however, braiding became much more than a baking technique.
It became a language of tradition.
Bread as a Symbol
Bread has held an important place in human civilization for thousands of years. It has been associated with nourishment, hospitality, prosperity, family, and celebration.
Because braided bread requires more time and attention than simply forming a round loaf, it naturally became associated with occasions when people wanted to make something special.
In many cultures, the braid itself carries symbolic meaning.
Three-strand braids have sometimes been associated with concepts such as unity, family, or interconnectedness. Four-, five-, and six-strand braids can create increasingly elaborate designs, turning an ordinary loaf into a centerpiece.
Even when the original symbolism is no longer understood, the tradition of making braided bread continues.
Challah: One of the World’s Most Recognizable Braided Breads
One of the best-known braided breads is challah, a traditional Jewish bread associated particularly with Shabbat and Jewish holidays.
Challah is typically made from an enriched dough containing ingredients such as eggs, flour, water, yeast, sugar or honey, and oil. The dough produces a tender, slightly sweet loaf with a beautiful golden crust.
The braid is one of challah’s most recognizable characteristics.
A simple three-strand braid is common, but challah can also be formed into four-, five-, or six-strand braids and elaborate holiday shapes.
For Rosh Hashanah, challah is traditionally shaped into a round loaf, representing the cyclical nature of the year. Raisins, honey, or other ingredients may also be incorporated depending on the tradition.
The beauty of challah lies not only in its flavor but in the care involved in preparing it.
It is bread intended to be shared.
Zopf and Swiss Braided Bread
Switzerland has its own beloved braided bread tradition known as Zopf.
Zopf is a rich, soft white bread traditionally braided into a loaf and associated with weekends and special occasions. The word itself relates to the braid-like shape of the bread.
Swiss Zopf is generally less sweet than many dessert-style braided breads. It is commonly served with butter, jam, honey, cheese, or other breakfast foods.
Its golden crust and soft interior demonstrate one of the great strengths of braided dough: the technique can produce something that looks elaborate without requiring an overly complicated recipe.
German and Austrian Braided Breads
German-speaking Europe has a long tradition of enriched and braided breads.
One famous example is Hefezopf, a sweet yeast bread that may be braided into three or more strands. Depending on the region and recipe, it can contain raisins, almonds, citrus zest, sugar, or other flavorings.
Braided breads are also closely connected with Easter traditions throughout Europe.
Many Easter breads are enriched with eggs, butter, sugar, and milk and decorated with braids, eggs, crosses, or other symbolic shapes.
The result is a bread that sits somewhere between everyday loaf and celebration cake.
Greek Tsoureki
Greece has another famous braided Easter bread: tsoureki.
Tsoureki is an enriched, sweet yeast bread traditionally flavored with distinctive ingredients such as mahleb and sometimes mastiha, along with citrus and spices.
It is commonly braided and may be decorated with dyed red eggs during Easter.
The braid gives the bread an impressive appearance, but the flavor is what makes tsoureki especially memorable. Its fragrant, slightly sweet interior makes it equally enjoyable as a breakfast bread, snack, or dessert.
Italian Braided Breads and Holiday Baking
Italy also has a rich history of decorative breads and sweet holiday loaves.
Italian baking traditions vary dramatically from region to region, and braided forms appear in different celebrations and recipes.
Easter is particularly important for decorative breads. Some recipes incorporate eggs directly into the bread or use whole eggs as decoration.
Italian bakers have long understood something that modern bakers are rediscovering:
food can be beautiful without sacrificing comfort.
The Rise of Babka
Few braided desserts have captured modern baking culture quite like babka.
Babka has roots in Eastern European Jewish baking traditions and has evolved considerably over time.
Traditional versions often feature a yeast-based dough filled with ingredients such as chocolate, cinnamon, nuts, or fruit preserves. The dough is rolled out, spread with filling, rolled up, sliced or twisted, and then placed into a loaf pan in a way that exposes the beautiful layers.
Unlike a simple three-strand braid, babka often uses twisting and folding to create a marbled interior.
When sliced, the result is spectacular.
Swirls of chocolate or cinnamon run through the tender bread, creating a dessert that is simultaneously bread, pastry, and cake.
Modern bakeries have expanded babka far beyond its traditional forms, experimenting with fillings such as pistachio, cookie butter, caramel, berries, cheesecake, and seasonal fruits.
Cinnamon Braided Bread
Perhaps the easiest way to introduce someone to braided desserts is through cinnamon bread.
A sweet yeast dough can be rolled into a rectangle, spread with butter, cinnamon, and brown sugar, and then transformed into a braid or twist.
Some bakers use two strands.
Others use three.
More adventurous bakers may cut the dough into multiple strips and create elaborate designs.
The finished bread can be topped with a simple glaze, cream cheese icing, powdered sugar, nuts, or even a drizzle of caramel.
This is where braided baking becomes particularly exciting.
The same basic dough can become breakfast bread, coffee cake, dessert, or an impressive holiday centerpiece simply by changing the filling and shape.
Braided Fruit Desserts
Fruit is another natural companion for braided dough.
Apples, peaches, cherries, blueberries, strawberries, pears, and other fruits can be cooked into thick fillings and enclosed in braided pastry.
One popular approach is to create a long strip of dough, place the filling down the center, cut the sides into strips, and cross the strips over the fruit.
The result resembles a woven pastry.
Apple cinnamon braids are particularly popular during the fall, while berry braids can bring a bright, summery quality to the table.
A simple powdered sugar glaze can transform the finished pastry into something worthy of a bakery display.
Danish Pastry and Braided Desserts
The world of Danish pastry also embraces twisting, folding, layering, and braiding.
Although laminated pastry is technically different from traditional bread dough, the principles overlap: dough is shaped carefully, fillings are incorporated, and the finished pastry is formed into attractive designs before baking.
Cream cheese, fruit, almond paste, chocolate, custard, and other fillings can all be incorporated into braided Danish-style pastries.
The result is flaky, buttery, and visually impressive.
Braiding Is About More Than Three Strands
When most people hear the word “braided bread,” they picture three strands.
But bakers can go much further.
Three-Strand Braid
The classic braid.
It is easy to learn, produces a beautiful loaf, and works especially well for challah, sweet breads, and enriched doughs.
Four-Strand Braid
A four-strand braid produces a wider and more intricate loaf. It has a beautiful woven appearance and is an excellent choice for special occasions.
Five-Strand Braid
Five strands create a more complex pattern and can make a loaf look almost like a piece of woven fabric.
Six-Strand Braid
The six-strand braid is a favorite among experienced bakers because it creates an exceptionally impressive finished loaf.
Twists and Knots
Not every braided bread needs to resemble a traditional braid.
Twists, knots, wreaths, loops, rings, and woven shapes can all transform dough into edible artwork.
The Science Behind a Beautiful Braid
Braiding isn’t only about appearance.
The way dough is divided and shaped affects the final loaf.
When dough is stretched into strands, the gluten structure is redistributed. Properly developed dough should be elastic enough to stretch without tearing but relaxed enough to roll into strands.
If the dough is too tight, it can spring back while being shaped.
If it is too soft or poorly developed, the strands may lose their definition during proofing.
The ideal dough should be smooth, elastic, and slightly resilient.
Another important consideration is strand size.
If the strands are dramatically different in thickness, the finished braid can bake unevenly.
Keeping the strands relatively uniform produces a more consistent loaf.
The Importance of Proofing
One of the biggest mistakes beginners make with braided bread is rushing the proofing process.
After shaping, the dough needs time to rise again.
This final proof allows the yeast to produce gas, which expands the dough and creates the light, airy structure we expect from a good yeast bread.
Underproofed bread can be dense and may split unpredictably in the oven.
Overproofed bread can lose its structure and cause the beautiful braid to flatten.
The goal is a loaf that has risen sufficiently while still retaining enough strength to hold its shape.
The Egg Wash: The Baker’s Finishing Touch
Many braided breads receive an egg wash before baking.
An egg wash gives the crust a glossy, deep golden appearance and helps decorative breads look especially polished.
For an especially rich finish, bakers may use a whole egg with a small amount of water or milk.
A lighter wash can be made with just egg white.
Milk or cream can also be brushed over some breads when a softer, less glossy crust is desired.
The finishing touch is often what transforms a braided loaf from homemade-looking to bakery-worthy.
Braided Desserts in the Modern Kitchen
Today’s bakers are taking traditional braiding techniques and combining them with modern flavors.
Some creative combinations include:
- Chocolate hazelnut braid
- Cinnamon roll braid
- Lemon blueberry braid
- Strawberry cheesecake braid
- Apple caramel braid
- Peach bourbon-style spice braid
- Raspberry white chocolate braid
- Pumpkin spice braid
- S’mores braid
- Peanut butter chocolate braid
- Cookies-and-cream braid
- Salted caramel pecan braid
- Cranberry orange braid
- Cream cheese Danish braid
The possibilities are practically endless.
A basic enriched dough can become an entirely different dessert simply by changing the filling, topping, and shape.
Braided Bread as a Centerpiece
One of the reasons braided bread remains so popular is its ability to serve as both food and decoration.
A braided loaf can sit in the center of a holiday table surrounded by fruit, flowers, candles, or seasonal decorations.
A braided cinnamon bread can become the centerpiece of a brunch.
A chocolate babka can turn an ordinary dessert table into something special.
A fruit-filled pastry braid can make a beautiful gift.
In this sense, braided baking continues an ancient tradition: making food visually meaningful.
The Emotional Side of Braided Baking
There is also something wonderfully human about making braided bread.
It requires time.
It requires patience.
It requires your hands.
You have to mix the dough, knead it, wait for it to rise, divide it, roll the strands, braid them, proof them again, and finally watch them transform inside the oven.
That process creates a connection between the baker and the food.
Perhaps that is one reason braided breads have survived for generations.
They are not simply recipes.
They are rituals.
Parents teach children how to braid dough. Families make holiday breads together. Bakers pass down recipes that may have been written decades ago—or never written down at all.
A braid can literally connect generations.
From Ancient Tradition to Modern Bakery
Braided bread has traveled an extraordinary journey.
What began as simple dough shaped by human hands became part of religious ceremonies, holidays, family traditions, regional cuisines, bakeries, restaurants, and modern social media.
Today, a baker can take a centuries-old technique and create something entirely new.
A traditional three-strand braid can become a chocolate-filled breakfast bread.
A European holiday loaf can become a seasonal bakery specialty.
A simple fruit braid can become a signature dessert.
The technique remains recognizable, but the possibilities continue to evolve.
The Future of Braided Baking
The future of braided breads and desserts is likely to be just as creative as their past.
Bakers are experimenting with sourdough, whole grains, alternative flours, savory fillings, international flavors, and elaborate shapes.
Social media has also introduced braiding to a new generation of home bakers. Videos showing complicated six-strand braids and intricate pastry designs have turned what once seemed like an advanced technique into something people are eager to learn.
Yet despite all the innovation, the heart of braided baking remains unchanged.
Flour.
Yeast.
Butter.
Eggs.
Sugar.
Time.
And a pair of hands willing to create something beautiful.
A Tradition Worth Continuing
Braided breads and desserts remind us that baking is about more than simply following instructions.
It is about creating.
It is about patience.
It is about tradition.
And perhaps most importantly, it is about sharing.
From challah and Zopf to tsoureki, babka, cinnamon braids, fruit pastries, and modern bakery creations, braided breads have crossed borders and generations while maintaining their ability to bring people together.
Every strand crosses another.
Every twist becomes part of the whole.
And when the finished loaf finally reaches the table, something ordinary has become extraordinary.
That may be the true beauty of braided baking: taking simple ingredients and weaving them into something that tells a story.
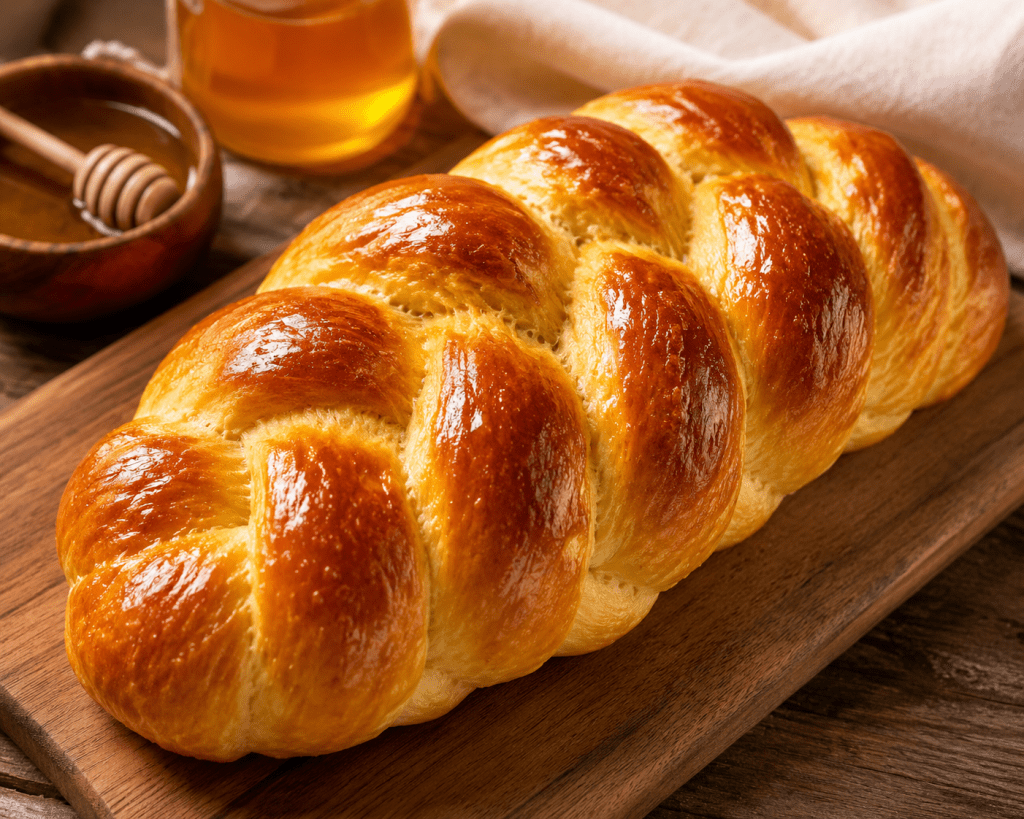
Golden Honey Braided Bread
Soft • Buttery • Slightly Sweet • Bakery-Style
This beautiful braided bread is soft and tender on the inside, golden and glossy on the outside, and lightly sweetened with honey. It makes a gorgeous centerpiece for breakfast, brunch, holidays, or a basket of freshly baked breads.
The dough is rich enough to feel special but versatile enough to pair with butter, jam, honey, cinnamon butter, or even savory fillings.
Yield
1 large braided loaf
Prep Time: 25 minutes
Rise Time: 1½–2 hours
Bake Time: 25–32 minutes
Ingredients
For the Dough
- ¾ cup warm whole milk, about 105–110°F
- 2¼ teaspoons active dry yeast (1 packet)
- 3 tablespoons honey
- 2 large eggs, room temperature
- 4 tablespoons unsalted butter, melted and slightly cooled
- 1½ teaspoons salt
- 3½–4 cups all-purpose flour
- 1 teaspoon vanilla extract
For the Egg Wash
- 1 large egg
- 1 tablespoon water
- 1 teaspoon honey
Optional Toppings
- Sesame seeds
- Poppy seeds
- Sliced almonds
- Pearl sugar
- Coarse sugar
- Flaky sea salt
- Cinnamon sugar
Instructions
1. Wake Up the Yeast
Place the warm milk in a large mixing bowl.
Add the honey and yeast and gently stir.
Allow the mixture to sit for 5–10 minutes, until the yeast becomes foamy.
If the mixture doesn’t foam at all, your yeast may be inactive and should be replaced.
2. Build the Dough
Whisk the eggs, melted butter, and vanilla into the yeast mixture.
Add the salt and 3½ cups of flour.
Mix until a shaggy dough forms.
Turn the dough onto a lightly floured surface and knead for approximately 8–10 minutes, adding the remaining flour a little at a time as necessary.
You want a dough that is:
- Soft
- Smooth
- Elastic
- Slightly tacky
- Not sticky
Avoid adding too much flour. A slightly soft dough produces a more tender finished loaf.
3. First Rise
Place the dough into a lightly greased bowl.
Cover with plastic wrap or a clean kitchen towel.
Allow it to rise in a warm, draft-free location for approximately 60–90 minutes, or until it has roughly doubled in size.
The exact time will depend on the temperature of your kitchen.
4. Divide the Dough
Turn the risen dough onto a lightly floured surface.
Gently press out the excess air.
Divide the dough into three equal pieces.
Roll each piece into a rope approximately 18–20 inches long.
Try to keep the ropes as evenly sized as possible.
5. Create the Braid
Place the three ropes side by side.
Pinch the tops together.
Braid the dough by bringing the outside strand over the center strand, alternating sides as you work down the loaf.
Try not to braid too tightly.
The dough needs room to expand during its second rise.
When you reach the bottom, pinch the ends together and tuck them underneath the loaf.
Transfer the braid to a parchment-lined baking sheet.
6. Second Rise
Cover the loaf loosely and allow it to rise for another 30–45 minutes.
The braid should become noticeably puffy.
Don’t wait until it completely doubles.
A properly proofed braided loaf should still have enough structure to hold its shape.
7. Prepare the Egg Wash
Whisk together:
- 1 egg
- 1 tablespoon water
- 1 teaspoon honey
Brush the mixture gently over the entire loaf.
Be sure to get into the creases of the braid, but avoid pressing down on the dough.
Sprinkle with sesame seeds, poppy seeds, sliced almonds, or coarse sugar if desired.
8. Bake
Preheat your oven to 350°F.
Bake the bread for approximately 25–32 minutes, depending on the size and shape of your loaf.
The finished bread should be a deep golden brown.
For the best accuracy, the center should reach approximately 190°F–195°F.
If the top begins browning too quickly, loosely tent the loaf with aluminum foil during the final portion of baking.
9. The Finishing Touch
Remove the bread from the oven and allow it to cool on the baking sheet for about 10 minutes.
Transfer it to a wire rack and allow it to cool completely before slicing.
For an extra-soft crust, brush the warm loaf with a little melted butter immediately after removing it from the oven.
⭐ Not Your Grams Kitchen Signature Variations
The basic dough can become several different signature products.
🍯 Honey Butter Braid
Brush the warm loaf with melted butter and honey immediately after baking.
🍎 Caramel Apple Braid
Roll the dough flat, spread with cinnamon butter, and add a thin layer of cooked diced apples before shaping.
Drizzle the cooled bread with caramel.
🍋 Lemon Blueberry Braid
Add lemon zest to the dough and fill with thick blueberry preserves or blueberry cream cheese filling.
Finish with a lemon glaze.
🍫 Chocolate Hazelnut Braid
Spread the rolled dough with chocolate-hazelnut spread before twisting or braiding.
Finish with powdered sugar or a chocolate drizzle.
🥜 Cinnamon Pecan Braid
Fill with softened butter, brown sugar, cinnamon, and chopped pecans.
Drizzle with vanilla icing after cooling.
🍓 Strawberry Cream Cheese Braid
Fill with sweetened cream cheese and thick strawberry preserves.
Finish with a simple powdered-sugar glaze.
Baker’s Tips for the Perfect Braid
Don’t over-flour the dough.
Too much flour creates a dry, heavy loaf.
Don’t braid too tightly.
The dough needs room to expand.
Keep your strands equal.
This helps the loaf bake evenly.
Watch your second rise.
Overproofing can cause the braid to lose its definition.
Use an egg wash.
It’s the secret to that gorgeous bakery-style golden shine.
Let it cool before slicing.
Cutting into hot bread can compress the delicate crumb.
Storage
Store the cooled bread in an airtight container or tightly wrapped at room temperature for up to 3 days.
For longer storage, wrap the completely cooled loaf tightly and freeze for up to 3 months.
Thaw at room temperature and warm briefly before serving.
A Little Bit of Bakery Magic
A braided loaf doesn’t need complicated ingredients to make an impression. The beauty comes from the combination of simple ingredients, patience, and careful shaping.
Once you master this basic braid, you can turn the same dough into an entire collection of signature breads and desserts—each one with its own flavor, filling, and personality.
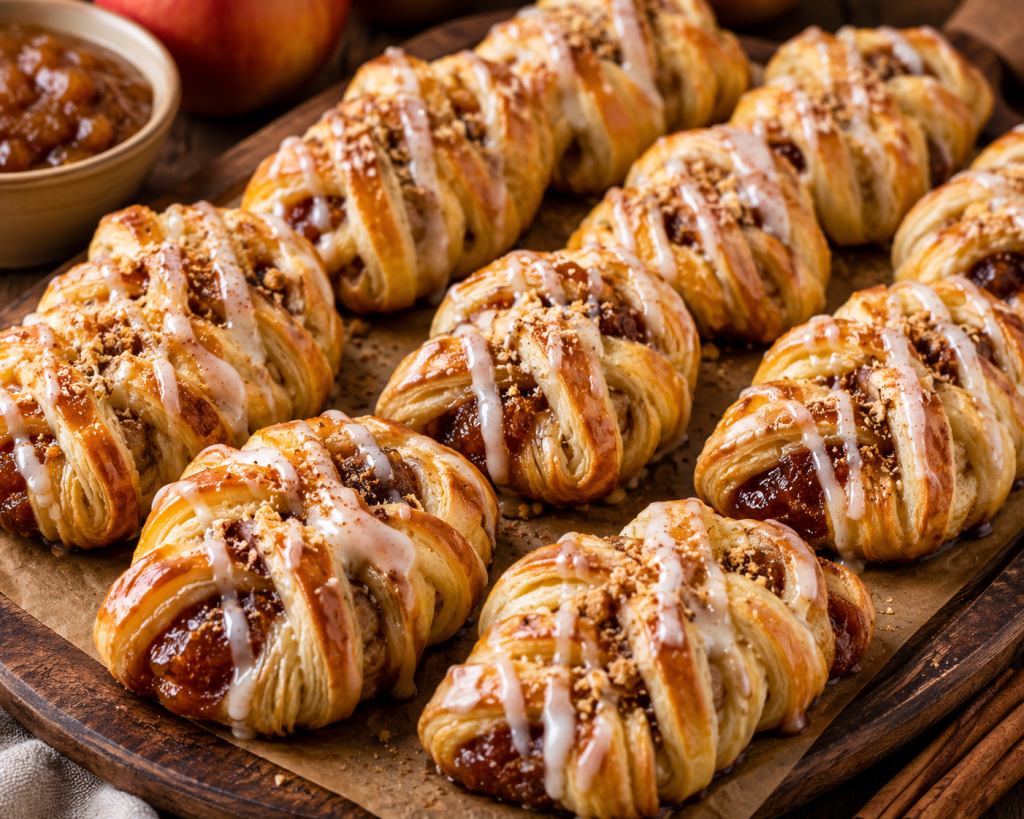
🍎 Mini Apple Butter Braided Desserts
Buttery, Flaky, Cinnamon-Scented & Glazed
These Mini Apple Butter Braided Desserts are little ribbons of soft, sweet dough wrapped around rich apple butter and warm cinnamon. Each one bakes into a golden, tender pastry with caramelized edges and a sweet vanilla glaze.
They are perfect for breakfast, brunch, afternoon coffee, holiday dessert tables, bake sales, or as an individual signature treat for Not Your Grams Kitchen.
Makes
12 mini braided desserts
Prep Time: 35 minutes
Rise Time: 1½–2 hours
Bake Time: 15–20 minutes
🧈 Ingredients
For the Sweet Dough
- ½ cup warm whole milk, 105–110°F
- 2¼ teaspoons active dry yeast
- ¼ cup granulated sugar
- 1 large egg, room temperature
- 1 teaspoon vanilla extract
- 4 tablespoons unsalted butter, melted and slightly cooled
- ½ teaspoon salt
- 2¼–2½ cups all-purpose flour
Apple Butter Filling
- ¾ cup apple butter
- 2 tablespoons packed brown sugar
- 1 teaspoon ground cinnamon
- ¼ teaspoon ground nutmeg
- ⅛ teaspoon ground cloves
- 1 tablespoon all-purpose flour or cornstarch
Optional Apple Filling
For an extra-special apple flavor:
- 1 small apple, peeled and finely diced
- 1 tablespoon butter
- 1 tablespoon brown sugar
- ½ teaspoon cinnamon
Egg Wash
- 1 egg
- 1 tablespoon water
🍎 Prepare the Apple Filling
If using the optional diced apple, melt the butter in a small skillet over medium heat.
Add the diced apple, brown sugar, and cinnamon.
Cook for approximately 3–5 minutes, stirring occasionally, until the apple softens slightly.
Do not cook it until mushy.
Remove from the heat and allow it to cool completely.
🥣 Make the Dough
Place the warm milk in a large mixing bowl.
Add the yeast and sugar.
Stir gently and let stand for 5–10 minutes, until foamy.
Add the egg, vanilla, melted butter, and salt.
Mix well.
Add 2¼ cups of flour gradually, mixing until a soft dough forms.
Turn the dough onto a lightly floured surface and knead for approximately 7–9 minutes.
Add the remaining flour only if necessary.
The dough should be soft, smooth, and slightly tacky—but not sticky.
⏰ First Rise
Place the dough in a lightly greased bowl.
Cover and let rise in a warm place for approximately 60–90 minutes, or until doubled in size.
✂️ Create the Mini Braids
Once risen, gently press the dough down.
Divide it into 12 equal portions.
Roll each portion into a small rectangle approximately 5–6 inches long and 2½–3 inches wide.
Place approximately 1 tablespoon of apple butter down the center.
If using the optional cooked apple mixture, add a small spoonful on top.
Sprinkle lightly with the cinnamon-brown sugar mixture.
🧵 How to Braid Each Dessert
Using a sharp knife or pastry cutter, make diagonal cuts along both long sides of the dough, leaving the center section with the filling untouched.
Fold the strips over the filling, alternating from one side to the other.
Cross each strip over the opposite side to create a beautiful woven appearance.
Pinch the final pieces together underneath.
Repeat with the remaining dough.
Place the mini braids on parchment-lined baking sheets, leaving space between each one.
🌟 Second Rise
Cover loosely with a clean kitchen towel.
Allow the mini braids to rest for 25–35 minutes.
They should become noticeably puffy.
🥚 Egg Wash
Whisk together:
- 1 egg
- 1 tablespoon water
Brush each braid lightly with the egg wash.
For an extra beautiful finish, sprinkle with a little coarse sugar.
🔥 Bake
Preheat the oven to 350°F.
Bake for approximately 15–20 minutes, rotating the baking sheet halfway through.
The braids should be beautifully golden brown.
Remove from the oven and allow them to cool for about 10 minutes.
🍦 Vanilla Apple Butter Glaze
Ingredients
- 1 cup powdered sugar
- 1 tablespoon apple butter
- 1–2 tablespoons milk or heavy cream
- ½ teaspoon vanilla extract
- Pinch of salt
Directions
Whisk everything together until smooth.
Add milk a few drops at a time until you reach a thick but drizzleable consistency.
Drizzle generously over the slightly warm mini braids.
For an extra bakery-style presentation, allow the first layer of glaze to set for a few minutes, then drizzle a second thin layer.
🍏 Optional Toppings
Take these little desserts to another level with:
- Chopped toasted pecans
- Walnuts
- Cinnamon sugar
- Caramel drizzle
- Powdered sugar
- Crushed graham crackers
- Toasted oat crumble
- White chocolate drizzle
- A pinch of flaky sea salt
My favorite combination:
Apple butter + cinnamon + toasted pecans + vanilla glaze + caramel drizzle.
It’s essentially a little apple-butter cinnamon roll and Danish rolled into one.
⭐ Not Your Grams Kitchen Signature Version
For a truly distinctive product, add ½ teaspoon orange zest to the dough and replace half of the milk in the glaze with fresh orange juice.
Finish each braid with:
Vanilla-orange glaze + toasted pecans + a tiny caramel drizzle.
The orange brightens the apple butter while the pecans and caramel give the dessert that warm, nostalgic fall flavor.
💡 Baker’s Tips
Keep the apple butter thick.
Thin apple butter can leak from the braids while baking. If yours is particularly loose, simmer it gently for a few minutes to thicken it before using.
Don’t overfill.
It can be tempting to add lots of apple butter, but too much filling makes the braid difficult to close and can cause leaking.
Cool before glazing.
If the pastries are extremely hot, the glaze will melt completely into the bread. Slightly warm is ideal.
Make them uniform.
For selling, weighing each dough portion will give you 12 beautiful, consistent pastries.
Make them ahead.
The shaped, unbaked braids can be refrigerated overnight. Allow them to come closer to room temperature and become puffy before baking.
🎁 Packaging Idea
For a bakery or cottage-food presentation, package these individually in clear bakery bags with a simple label:
NOT YOUR GRAMS KITCHEN
Mini Apple Butter Braids
“A Little Taste of Homemade Happiness”
For seasonal sales, a small box containing 4 or 6 mini braids would make a beautiful fall gift.
🍎 The Finished Treat
The perfect Mini Apple Butter Braid should have a golden, slightly crisp exterior, a soft buttery center, warm cinnamon throughout, and a generous ribbon of apple butter running through every bite.
Then comes the glaze.
Sweet.
Creamy.
Vanilla-rich.
With just enough apple spice to make you want another one.
One bite tastes like autumn.
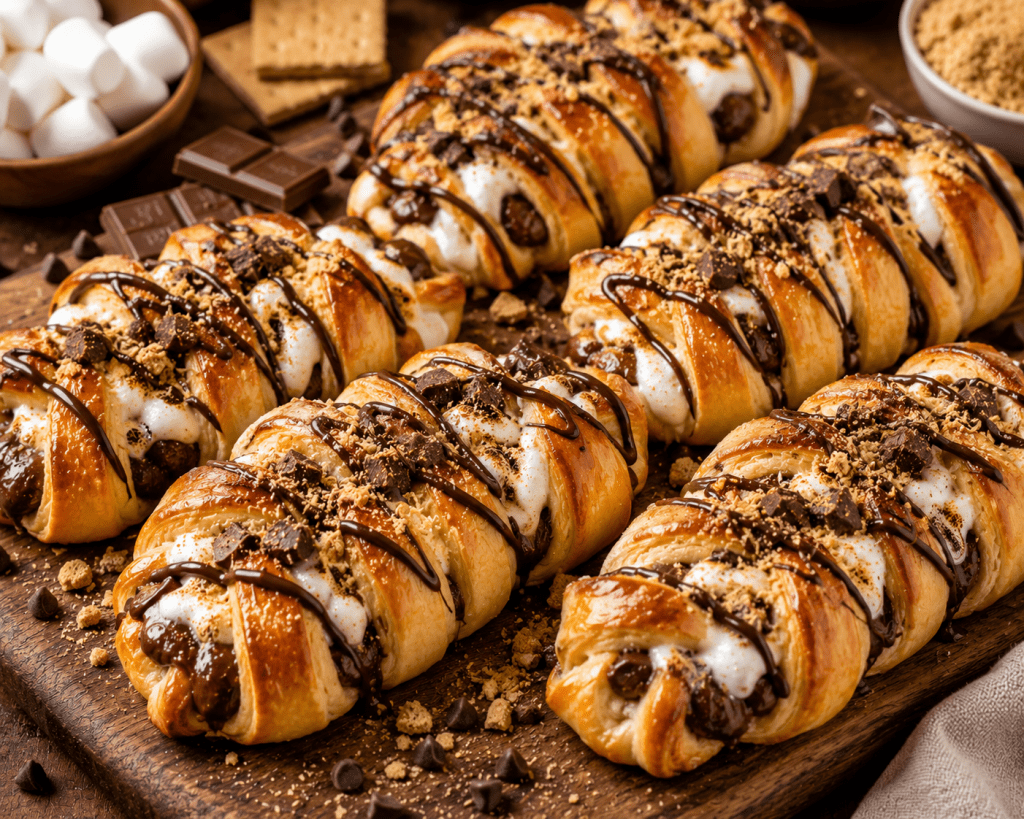
🔥🍫 S’MORES BRAIDED DESSERT
Soft Sweet Bread • Gooey Marshmallow • Rich Chocolate • Graham Cracker Crunch
Imagine everything you love about a campfire s’more transformed into a warm, golden braided pastry.
This S’mores Braided Dessert starts with a soft, buttery sweet dough layered with chocolate and graham cracker crumbs, then braided and baked until golden. A gooey marshmallow filling melts into the layers, while a chocolate drizzle and toasted marshmallow topping finish the dessert.
It’s part pastry, part sweet bread, and completely irresistible.
Makes
12 individual mini braids or 1 large braided dessert
Prep Time: 35 minutes
Rise Time: 1½–2 hours
Bake Time: 18–25 minutes
🧈 SWEET BRAIDED DOUGH
Ingredients
- ½ cup whole milk, warmed to 105–110°F
- 2¼ teaspoons active dry yeast
- ¼ cup granulated sugar
- 1 large egg, room temperature
- 4 tablespoons unsalted butter, melted and cooled slightly
- 1 teaspoon vanilla extract
- ½ teaspoon salt
- 2¼–2½ cups all-purpose flour
Directions
Place the warm milk in a large mixing bowl.
Add the yeast and sugar.
Stir gently and let stand for 5–10 minutes, until foamy.
Add the egg, melted butter, vanilla, and salt.
Mix until combined.
Gradually add 2¼ cups flour.
Once the dough begins coming together, turn it onto a lightly floured surface.
Knead for approximately 7–9 minutes, adding additional flour only as needed.
The finished dough should be soft, smooth, and slightly tacky.
⏰ FIRST RISE
Place the dough in a lightly greased bowl.
Cover with plastic wrap or a clean kitchen towel.
Let rise in a warm, draft-free area for approximately 60–90 minutes, or until doubled in size.
🍫 S’MORES FILLING
Ingredients
- ¾ cup semi-sweet chocolate chips
- ½ cup milk chocolate chips
- ½ cup graham cracker crumbs
- 3 tablespoons brown sugar
- 2 tablespoons melted butter
- ½ teaspoon cinnamon
- 1 teaspoon vanilla extract
Directions
Combine the graham cracker crumbs, brown sugar, melted butter, cinnamon, and vanilla.
Mix until the crumbs resemble a moist streusel.
Set aside.
☁️ MARSHMALLOW CENTER
For the best results, use marshmallow creme rather than large marshmallows inside the braid.
Ingredients
- ½ cup marshmallow creme
Keep refrigerated until you’re ready to assemble the braids.
Chilled marshmallow creme is easier to work with and less likely to spread before the dough is shaped.
🧵 FORMING THE BRAIDS
Once the dough has doubled, gently punch it down.
Divide into 12 equal pieces for individual desserts.
Roll each piece into a rectangle approximately 5–6 inches long and 3 inches wide.
Place approximately:
- 1 tablespoon graham cracker mixture
- 1 tablespoon chocolate chips
- 2 teaspoons marshmallow creme
down the center.
Do not overfill.
✂️ CUT AND BRAID
Using a sharp knife or pastry cutter, make diagonal cuts along both long sides of the dough.
Leave the center portion underneath the filling intact.
Fold the strips across the filling, alternating sides to create a woven braid.
Pinch the ends together and tuck them underneath.
Place the finished braids on parchment-lined baking sheets.
Repeat with the remaining dough.
⏰ SECOND RISE
Cover loosely with a clean towel.
Allow the braids to rest for 25–35 minutes.
They should become visibly puffy.
🥚 EGG WASH
Whisk together:
- 1 egg
- 1 tablespoon water
Brush lightly over each braid.
Sprinkle the tops with a little additional graham cracker crumb.
🔥 BAKE
Preheat your oven to 350°F.
Bake the mini braids for approximately 18–22 minutes, or until golden brown.
If making one large braid, bake approximately 25–30 minutes.
Watch carefully toward the end because the chocolate and marshmallow filling can become very hot.
Allow the finished braids to cool for approximately 10–15 minutes.
🍫 CHOCOLATE DRIZZLE
Ingredients
- ½ cup semi-sweet chocolate chips
- 1 teaspoon coconut oil or shortening
Melt together gently in the microwave in 15–20 second intervals, stirring between each interval.
Drizzle over the cooled braids.
☁️ TOASTED MARSHMALLOW FINISH
For the ultimate s’mores experience, add small dollops of marshmallow creme to the tops of the cooled braids.
Quickly toast the marshmallow using a kitchen torch until golden brown.
Do not leave the torch unattended, and keep it away from packaging and other flammable materials.
Finish with:
- Graham cracker crumbs
- Chocolate drizzle
- Mini chocolate chips
- A tiny pinch of flaky sea salt
⭐ NOT YOUR GRAMS KITCHEN SIGNATURE VERSION
For an unforgettable signature dessert, turn these into:
“Campfire S’mores Braids”
Add a thin layer of chocolate ganache beneath the marshmallow filling.
After baking, top each braid with:
Chocolate ganache + toasted marshmallow + graham cracker crumble + milk chocolate drizzle + flaky sea salt.
The contrast of crunchy graham cracker, gooey marshmallow, rich chocolate, and soft sweet bread makes these incredibly indulgent.
🍯 OPTIONAL CARAMEL S’MORES VERSION
Want to make them even more decadent?
Add ½ teaspoon of thick caramel sauce to the filling.
Then finish the baked braid with:
- Chocolate drizzle
- Caramel drizzle
- Toasted marshmallow
- Graham cracker crumbs
- Flaky sea salt
This creates a Salted Caramel S’mores Braid that’s especially good for fall and holiday menus.
💡 BAKER’S TIPS
Don’t overfill the braids.
Too much chocolate or marshmallow can cause the filling to escape during baking.
Keep marshmallow creme chilled.
It makes assembly much easier.
Use thick chocolate.
Chocolate chips work beautifully, but chopped chocolate bars create pockets of melted chocolate throughout the braid.
Don’t skip the graham crackers.
They’re what gives the dessert that unmistakable s’mores flavor.
Add the toasted marshmallow after baking.
This gives you much better control over the texture and appearance.
🎁 SERVING & PACKAGING
These are perfect served slightly warm with a cup of coffee, hot chocolate, or cold milk.
For a bakery presentation, place each cooled braid into an individual clear bakery bag or small pastry box.
For seasonal gift boxes, package 4, 6, or 12 braids together with a small card describing the dessert.
Suggested product name:
🔥 Campfire S’mores Braids
All the magic of a campfire s’more—woven into every bite.
❤️ THE PERFECT BITE
The ideal S’mores Braided Dessert has a soft, buttery center surrounded by golden sweet bread.
Then comes the crunch of graham cracker.
The richness of melted chocolate.
The gooey marshmallow.
And finally, that little hint of toasted flavor that takes you straight back to sitting around a campfire.
It’s not just a dessert. It’s a campfire memory—baked into a braid.


One thought on “The Beautiful Art of Braided Breads & Desserts”